Friday, December 28, 2012

Christmas Pictures

I was a lucky girl this Christmas... my hubby got me a new lens for my camera... a 35mm f/1.8 lens that can help get that cool bokeh look in some of my pictures.  I begged the hubs to let me open my present a few hours early because I have been drooling over the Unskinny Boppy's photo from her post "Taking Glowing Pictures of the Tree."  Her cool picture of her son has been flying like crazy through Pinterest and I have been lusting over one of my own.

I started by using her settings: ISO 3200, f/1.8, ss 1/30th... but played a bit to try and get the lighting a bit brighter.  I am fairly new to using my camera in manual mode... but I am LOVING experimenting with it!
This was taken with all the lights off, ISO 6400, f/1.8, ss 1/30.
Little sis moves more... so getting a clearer picture of her in low light is a tad bit more tricky, but with the same settings I got this shot- kind of grainy, but I am still in love.

And after Santa stopped in, I snapped a few shots at ISO 1600, f/1.8, ss 1/30.
 The one of the whole tree I raised my f-stop up a bit... ISO 1600, f/2.2, ss 1/30.

It is so fun to experiment with having a DSLR!  I hope you and your families had a beautiful Christmas and thanks to Unskinny Boppy for the inspiration!

~Christy


Wednesday, December 19, 2012

A Great DIY Teacher Gift... Heart-shaped Hand Warmers

So this is my daughter's first year of Pre-School.  Being a teacher myself, I knew I wanted to get her teachers something special and unique that didn't break the bank (especially since she has a zillion random teachers!).  I saw this super cute idea for hand warmers made from fleece and rice on Pinterest and after some image searching I finally found the original post from The Inbetween Girls for DIY Hand warmers. Since I know how chilly recess can be, I was sold.  I changed it up a bit, so here is what we (big sis got to help!) did...

From JoAnn's, I picked up a roll of fleece from the remnants bin (there are a ton of super cute fleece prints and solids this time of year), embrodery thread found by the needlepoint section, some needles that could handle the thick embroidery thred, and some cute white favor bags from the wedding section to carry them in.  In all my bill was about $10.  I also used white rice and a funnel from our pantry, a heart cookie cutter for the shape, and a fabric pen for tracing.
I laid out the fleece and traced my hearts on, four hearts for each gift.  I traced 32 hearts for the 8 teacher gifts I needed to make.
Next I cut them all out and one by one began stitching two together at a time.  I decided to use a simple hand stitch instead of the sewing machine for a few reasons... 1. I like the way the chunky thread gives an antiquey feel (plus you can tie the two ends to make cute bows this way!) 2. It seems easier to fill with rice and continue to make those last few stitches 3. It really doesn't take much longer by hand anyway.
When sewing around the edges leave about an inch to use the funnel and fill with rice.  I found I needed less than 2' of thread for each one and between 1/4 and 1/3 cup of rice.
Big sis was great help filling the hearts with rice... that was her part.  Little sis tried to help too... by chewing on the funnel!

Once they were filled with rice, I finished stitching, tied it off with a knot, then tied a cute bow with the two thread ends.


And since I am addicted to chalkboard word creations (just check out my Printables page, lol!) I made a cute little poem and gift tag to tie onto the wedding favor bags.  They are 4X6 and can just be printed onto index cards.  I printed mine on the front and back, cutting them apart to get two tags per index card.  Click below to get the free printable file!
She is taking in her little gifts tomorrow... I hope her teachers enjoy them!
What is your favorite handmade gift?  I'd love to hear and see about your creations this year! 

Linking up...


Redhead Can Decorate

Tuesday, December 11, 2012

Chalkboard Christmas Tree Printable

I just love all of these chalkboard printables that are floating around Pinterest... and to confess, I am a bit addicted to making them!  Here is my latest creation... cropped as an 8X10 to place in any frame that is just lying around the house to add a little extra Christmas charm to that mantle!?

Just click on the picture to download for free.  When printing it may warn you that the quality is poor, but because it is not a photograph, it will print fine!

Looking for some other Christmas printables... visit my Custom Printables page.

Thanks for stopping in!

Wednesday, December 5, 2012

Santa Gift Tags... for those Special Gifts from the North Pole

I am just having too much fun creating Christmas printables... the latest???  Special tags from Santa himself!  Just take a look... they come directly from the North Pole!  And of course, they are only for good boys and girls!


These are 4X6 prints designed to be printed directly onto 4X6 postcards.  Click on the "boy" or "girl" tag above to download for free!  Enjoy :)


A Bowl Full of Lemons

Monday, December 3, 2012

Christmas Gift Tags... Peach, Magenta, & Teal, Oh my!

I have been playing around with those oh so fun Christmas gift tags again.  I love these colors together, how about you!?  To download the free PDF, just click on the picture above!  Enjoy :)

Monday, November 26, 2012

Christmas Tags... Chalkboard Effect!?!

I have been playing with all sorts of new fonts and have been toying with the idea of making some of my own Christmas tags for presents this year {because I just hate to buy something I could easily make!}. 

The tags above are designed to be printed on regular 8 1/2" X 11" paper or card stock and can easily be cut apart.  What do you think???  Do you like them?  I am thinking about making a few more with different styles/themes!

{Please feel free to download and use!!!  The link above will take you to the free PDF}

Here are a few closer up pictures :)


Cheers!

{P.S. Let me know if you are using- I would love some feedback!}

Click HERE to see more Christmas gift tags in magenta, peach, and teal!

And don't forget to tag Santa's present for all of your good boys and girls ;)

Monday, November 19, 2012

What simple things are you celebrating this week?

I am not a professional photographer nor will I ever be, but I love to take pictures.  I am excited to link up with Simple As That, a blog that I am currently in love with, for their Simple Things Sunday link up party which is all about photography. 

What simple things are you celebrating this week?  I am celebrating family; my two beautiful girls are the light of my life.  They are amazing.  I am celebrating that I am in a place in this world where I can have those beautiful girls play in crunching fall leaves for a bit and I can pretend that I know what I am doing while I snap their pictures.  Life is good.  I celebrate that...

What are you celebrating this week??


An Easy DIY Hat Holder


 We just completed a quick and much needed morning project.  When I say quick, I mean less than 30 minutes start to finish including the time it took for the hot glue gun to warm up.  What did we make??  A hat holder!!  And when I say we, I mean me and my two trusty side kicks, big sis and baby sis.  (As you can see, baby sis played a crucial role!)

The Problem:  Too many hats, not enough hooks!!


The Materials:

3- 12" wooden dowels (less than $2 for a bag of 5)
2 to 3 yards of thick ribbon
4 decorative buttons
1 1/2 to 2 feet of rope (I used some thick hemp I already had)
12 wooden clothespins
Hot Glue Gun

How To:

Cut your ribbon so you have two equal lengths.  Just over a yard each is what I had.  Lay out the ribbons good side down, and place one dowel at the top, one in the middle, and one at the bottom.  Glue the ribbon onto the dowel at the top and bottom, wrapping the ribbon around each dowel.  Glue the center dowel on with just one line of glue on the ribbon.
Next, turn it over so the good side is up.  Lay out your clothespins so they are equally spaced, 6 on one side, 6 on the other (each of mine were 2 1/2" apart).  Glue each wooden clothespin down.
Next glue on your decorative buttons at the top and bottom and tie your rope to both side of the top dowel.  Use a dab of hot glue to keep the rope knots in place.  And, ta-dah!  You are finished, that quick and easy!
To hang the hats, simply clip on with the clothespins.  Pretty much any type of hat works this way; beanies, sun hats, cowboy hats, and even baseball caps.
Gone are the days of searching for just one beanie to keep those little ears warm- they are right there on the back of the girls' door!  

Are you as over-run with hats as we are!?  Who knew girls could accumulate so many hats!!!  I am so happy to have this little project done!


Sunday, November 18, 2012

A Sunflower Summer and How We Made Our Own Sunflower Seeds


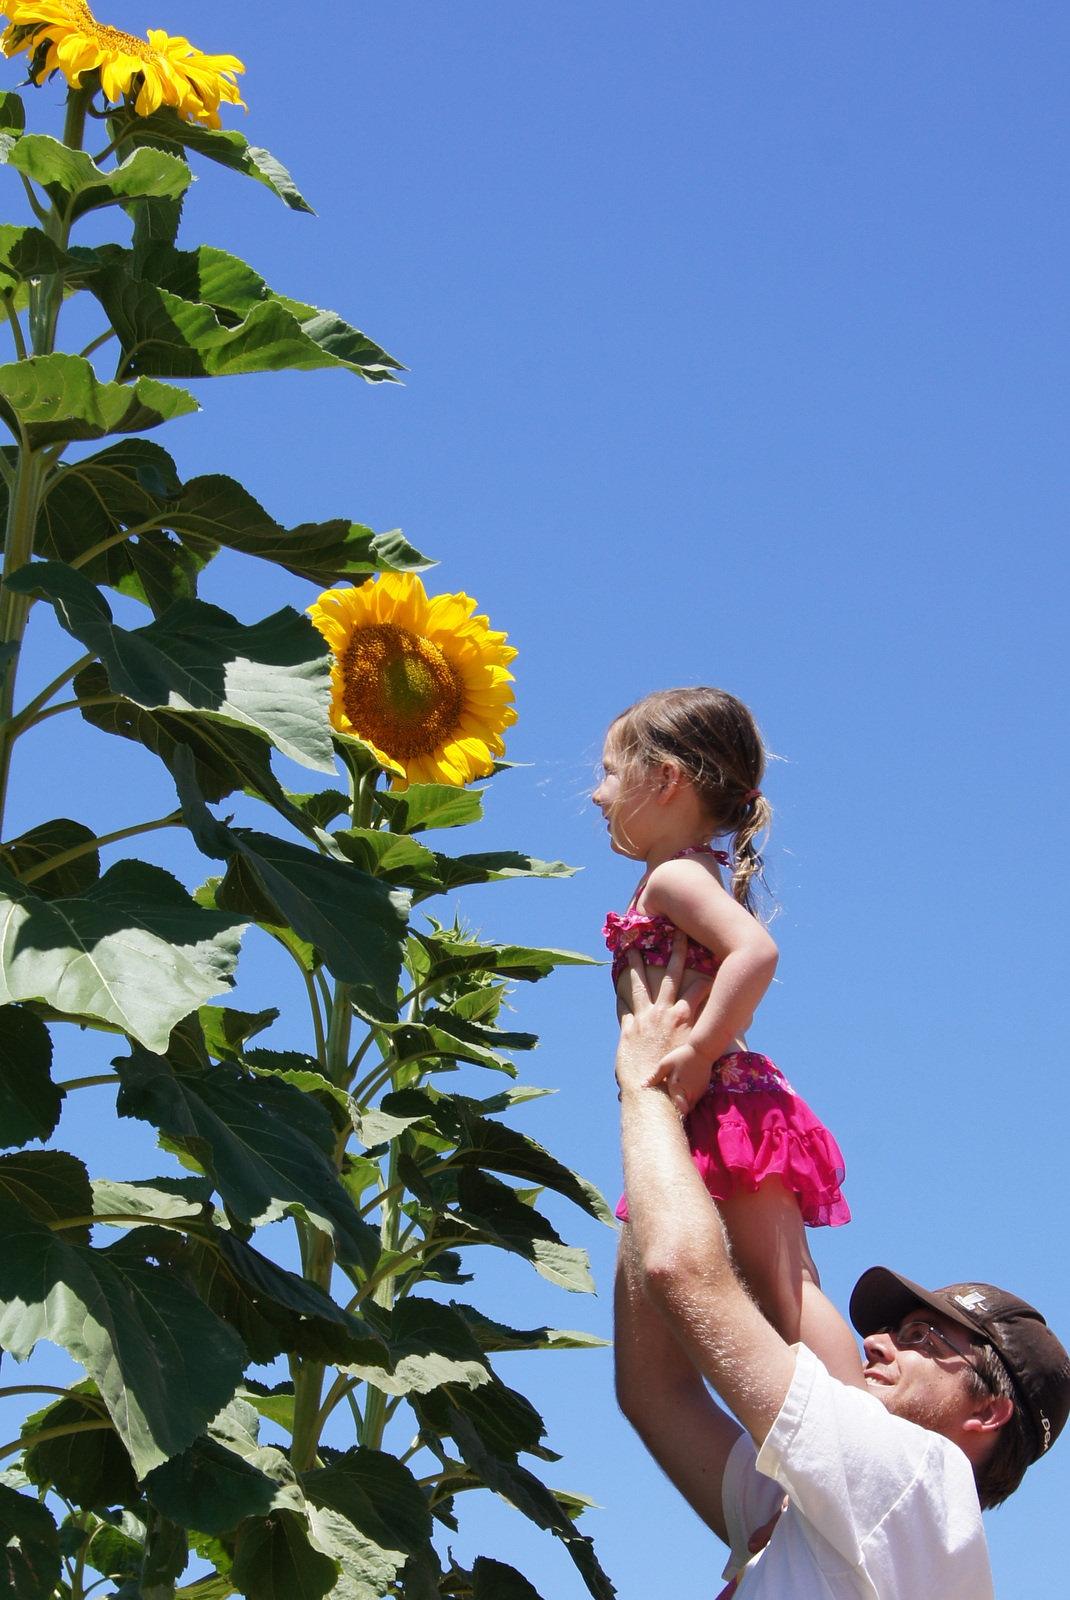
I have never been a huge fan of sunflowers, but last summer my husband convinced me to plant a sunflower garden next to our raised beds.  I was excited about the "good" bugs that they would bring our veggie garden, but I didn't realize just how much I would fall in love with these gorgeous flowers.  Needless to say, I am a changed woman!  Even though we only had a Nikon CoolPix point and shoot camera at the time (we have since upgraded to a DSLR), I was obsessed with trying to get the most stunning sunflower pictures!  They may not be professional grade, but to say the least, I had fun taking them and my little doll of a model just loved hiding in them.

If you have never planted sunflowers, I highly recommend doing it!  They are easy to grow and come in the most stunning shapes and sizes.  The added bonus: lots of lady bugs and bees hanging around!


So this summer when my hubby pulled out the sunflower seeds, I was fully on board.  This summer however, he had an ulterior motive; he wanted the seeds!  To be honest, I was kind of excited about this new endevour.  I love trying something new... especially if it is something I get to make that normally we would buy.  I am not a huge sunflower seed fan, but the hubby loves easting sunflower seeds and now big sis is quite the fan as well.

How we made our own sunflower seeds...

Since I had never done this before, I went on a sunflower seed how to hunt.  I found a resource that I thought couldn't sound more perfect: the National Sunflower Association, which just so happens to have a zillion facts about sunflowers AND and very simple How to Roast In Shell Sunflower Seeds.  I basically followed these very simple directions with the addition of some flavors we already had on hand for a fun little experiment!

These were HUGE sunflowers, I must start by stating!  We found our seeds just by browsing the local garden section finding Ferry Morse Organic Sunflower, Mammoth seeds.  We had a blast watching them grow all summer and as fall made it's claim, we cut down three of the heads to use for seeds... yep, you heard me right- just three of them!  Just check out how amazingly large these guys were!


To start out, using gloves, I pulled out all the seeds into a large bowl.  They fall out fairly easy... and little sis even came to help mom!


Using a salad spinner I washed these little suckers a zillion times until the water came out clean, each time picking out any little pieces of stem, leaves, or dried flower that followed my seeds into the bowl.  Patience may be a necessity here!  As per the National Sunflower Associations website, I mixed the seeds with water and salt and let soak overnight.

{I also found this cool website,  that had a trick for cracking and separating the seed from the shells- I haven't tried, but maybe next year!  Especially since I found a recipe for Pesto made with sunflower seeds... doesn't that sound amazing!?}


The next day after the long salty soak, I rinsed and dried the seeds.  I separated into three different sheets for roasting.  I decided to sprinkle one with a  BBQ seasoning we had on hand, a ranch mix, and the third portion was left plain.  We roasted the seeds about 45 minutes on 300 degrees.  The National Sunflower Association suggested 30-40 minutes at 300, but they didn't seem quite "dry" enough, so we left in a bit longer!


We pulled them out of the oven and let the cool for hours.  Once they were nice and cool, I just used zip-lock bags to store the seeds (the website suggests airtight containers).  Dad and big sis have been enjoying their custom made little snack!  The three sunflower heads made four zip-lock sandwich baggies full plus enough for me to give a nice little snack to the chickens (I think they liked our little project as well!).
Have you ever made your own sunflower seeds?  Do you have any fun tips or recipes to share?  Please share in the comments section below if you do!  I'd love to store any neat ideas for next year's sunflower garden :-)


Pin It button on image hover